Creating Your Personalized Dummy Dataset with R
Guest writer Chris demontrates how to turn real data to dummy data to use in multiple projects.

Customized Dummy Data From Scratch
The times you want to share how you solved a real life problem using a certain dataset may be hindered, because you can not reveal the real data used. This becomes a problem when trying to demonstrate the solution.
In such cases, you will need similar but dummy data so that you can illustrate the exact same steps you followed. The solution is to create that dummy data by and for yourself. That is when you will need personalized dummy data because you will not always be able to find the dummy dataset matching exactly your real data for easy and comprehensive demonstrations.
To solve this, I will use my real life case study and share how I created the same but dummy data from real data I had at hand which acted as raw material for further demonstration.
Why Do We Need Dummy Data?
We need dummy data for several reasons. My reason was to maintain user anonymity in the dataset for demonstration.
Data anonymity is more serious than what people think, because only a little leakage of true information about individuals or entities without consent, will compromise data privacy and integrity no matter how urgent the data approval means for continuity on a project. This raises the question: How do you maintain professional ethics and integrity when dealing with data?
When you’re trying to be as mindful as possible with data privacy, you can create dummy data to represent your real data. For example, if your actual dataset includes “a basket with an apple, an orange, and a banana”, you could represent this with a dummy dataset saying, “a container with fruit A, fruit B, and fruit C”.
This way, any calculations or operations you do with fruits A, B, and C in your dummy dataset can be directly applied to the real items in the original dataset.
This method of using a dummy dataset allows you to maintain the anonymity of the original data while still being able to perform useful analyses.
Scenario
A colleague of mine shared with me an excel file consisting of a list of 23 individuals with information of their names, sex (male/female) and citizenships. They were from different nationalities and I had to group all the 23 individuals into 5 groups for an upcoming assessment activity.
The following steps show how I personalized the dummy data from the dataset I was given.
Creating the Dummy Data
Below is the summary of nationalities distribution of the dataset shared with me:
# Nationality representatives by number of individuals
1. Nationality 1 = 13
2. Nationality 2 = 2
3. Nationality 3 = 2
4. Nationality 4 = 2
5. Nationality 5 = 1
6. Nationality 6 = 1
7. Nationality 7 = 1
8. Nationality 8 = 1

# Note:

The group consisted of 7 males and 16 females. The table with original
data had four columns namely, S/N, Names, Sex and Nationality.
I would refer to this structure while creating my dummy dataset.
Step 1: Creating the Basic Structure
I created a data frame with the columns: S/N (Student Number), Names, Sex, and Nationality (the same columns of the real dataset) as placeholders of the population’s information to be populated in the future. Refer to the code snippet below:
# Step 1: Creating an empty data frame with specified columns
dummy_data <- data.frame(
 "S/N" = integer(23), # Sequence number for 23 students
 "Names" = character(23), # Placeholder for student names
 "Sex" = character(23), # Placeholder for sex
 "Nationality" = character(23) # Placeholder for nationality
)
Step 2: Populating The S/N and Names Columns
The S/N is the numbering by order and individual names were replaced by students 1 through to student 23 under the Names column.
# Step 2: Populating the S/N and Names columns

dummy_data$"S/N" <- 1:23 # Sequence from 1 to 23
dummy_data$Names <- paste("Student", 1:23) # Creating names Student 1 to Student 23
Step 3: Assigning Sex to The Name
This time I chose to randomly assign sex (male/female) to the names as long as I make sure to make 7 males and 16 females for the whole dataset to make 23 entries.
# Step 3: ASSIGNING SEX TO NAMES

# Setting the seed for reproducibility
set.seed(123)

# Randomly assigning 7 males and 16 females
dummy_data$Sex <- sample(c(rep("Male", 7), rep("Female", 16)))
Step 4: Assigning Nationalities
I assigned nationalities based on the provided distribution (as described above) and ensured the correct counts for each “Nationality”.
# Nationality distribution

nationality_distribution <- c(rep("Nationality 1", 13),
rep("Nationality 2", 2), rep("Nationality 3", 2), rep("Nationality 4", 2),
rep("Nationality 5", 1), rep("Nationality 6", 1), rep("Nationality 7", 1),
rep("Nationality 8", 1))

# Randomly assigning nationalities while maintaining the distribution
dummy_data$Nationality <- sample(nationality_distribution)
Step 5: Reviewing The Dataset
# Viewing the first few rows of the dummy dataset

head(dummy_data)
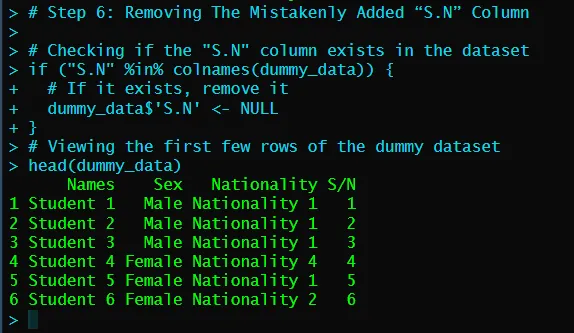
Step 6: Removing The Mistakenly Added “S.N” Column
For the “S.N” column that was mistakenly added, I removed it by first checking if it exists then removed it.
# Checking if the "S.N" column exists in the dataset
if ("S.N" %in% colnames(dummy_data)) {

 # If it exists, remove it
 dummy_data$'S.N' <- NULL
}
Below is the screenshot of the output after the column removal:
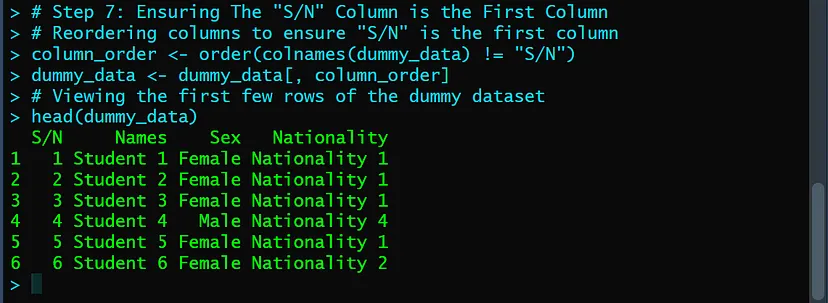
Step 7: Ensuring The “S/N” Column is the First Column
To ensure “S/N” was the first column, I had to reorder the columns based on my preference. So, I rearranged the columns accordingly using the order() function.
# Step 7: Ensuring The “S/N” Column is the First Column
# Reordering columns to ensure "S/N" is the first column

column_order <- order(colnames(dummy_data) != "S/N")
dummy_data <- dummy_data[, column_order]
Below is the screenshot of the output after the column rearrangement:
Step 8: Exporting Dataset from R
To export this dataset, I could export it as a csv file using the write.csv() function in R. I would recommend this if you want to keep doing more operations with the dataset in R.
If you want to export it as an excel file, the write.xlsx() function from the open xlsx package provides flexible options for writing data frames to Excel files, including specifying sheet names and whether to include row names.
Step 8.1. Exporting Dataset To A CSV File
In the code below, “dummy_data” is the name of the data frame, “dummy_dataset.csv” is the name of the file I was creating, and row.names = FALSE is to ensure that row names, which are just row numbers in this case, are not included in the exported file.
# Step 8.1. Exporting the dataset to a CSV file

write.csv(dummy_data, "dummy_dataset.csv", row.names = FALSE)
Step 8.2. Exporting Dataset To An Excel File
There is a small particularity with exporting the dataset as an Excel file. You will need (If you haven’t already) to install and load the openxls package into your R session.
# Step 8.2. Exporting the dataset to an Excel file
# Installing openxlsx package (if it's not already installed)
if (!requireNamespace("openxlsx", quietly = TRUE)) {
install.packages("openxlsx")
}
# Loading the openxlsx package
library(openxlsx)
# Exporting the dataset
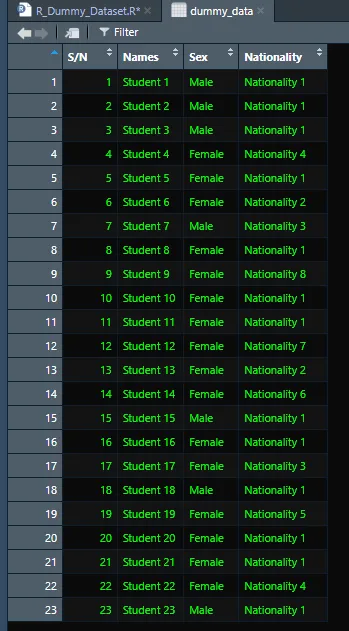
write.xlsx(dummy_data, file = "dummy_dataset.xlsx", rowNames = FALSE)The Outcome
The table below contains the dummy data similar to those applicable on real data, ensuring full anonymity without compromising data privacy.
Conclusion
Not only is dummy data a good way for data privacy but it’s also a good process for generating a large dataset of over 500+ individuals that have many nationalities.
Share your thoughts!!
 |
|